Affinity Studio
Shortcuts, Key Commands & Resources
- by: Jessica Hische
- Updated: Feb 26, 2026
Affinity Studio is free professional creative software. Prior to their latest release, Affinity was a suite of individual apps not unlike Adobe Creative Suite. Affinity Studio is now a single app that combines all of the features of the individual apps into one, allowing users to seamlessly combine vector and raster artwork, create page and book layouts, and more. Canva (which owns Affinity) recently acquired the motion graphics platform Cavalry, which will add 3D and motion graphics tools to Affinity.
Affinity Studio is free. The only features that are not free, are generative AI tools, which require a Canva Pro subscription. The fact that generative AI is not included by default in the program is a bonus for many creatives, who feel generative AI tools are pushed too heavily in other software.
Studioworks co-founder Jessica Hische (that’s me, this article’s author!) is on an advisory board for Canva and has switched to Affinity as her primary creative software—not because she was compelled to by Canva, but because it’s a better fit for her workflow and a truly powerful tool. The video below is a walk-through of the program and key differences from Adobe Creative Suite.
Key Differences
Notable Differences between Affinity and Adobe
It’s Free
Adobe Creative Suite requires a monthly subscription. Affinity Studio is free in perpetuity. It’s owned by Canva, who is committed to keeping it free for everyone. Jess explained how this is possible on Threads when the announcement was first made.
One App vs. Multiple Apps
Adobe Creative Suite is a suite of individual apps. Affinity Studio is a single app that combines all of the features of the individual apps into one. You can achieve the feeling of working in multiple apps by using different “studios” (workspaces) in Affinity Studio (like Vector, Pixel, and Layout). But the real magic happens when you create a custom studio that combines the tools and panels you use in your specific workflow.
No AI Tools by Default
Generative AI tools are not included by default in Affinity Studio. You can purchase a Canva Pro subscription to access the generative AI tools, and the monthly fee is $12 for an annual plan or $15 for a monthly plan. (I don’t mean for this to sound like a commercial to sign up; just passing along the info in case it’s of interest.)
File Compatibility
Affinity’s file format is .af. You cannot open a .af file in Adobe Creative Suite but you can open most Adobe formats in Affinity (.ai, .eps, .pdf, .psd, .svg, .idml, etc.). Affinity allows you to export files to Adobe friendly formats (.eps for layered Illustrator files, .psd for Photoshop, and generic flat vector and raster file extensions). This means you can open and edit your existing Adobe files in Affinity or save files from Affinity to Adobe-friendly formats to share with clients or vendors. Because the underlying technology is different in Affinity, some complex objects may not be exported with the full editability (like gradients).
InDesign Compatibility
InDesign is the only file format that is a little tricky. Affinity is more richly featured than InDesign as page layout software—photo and illustration assets are fully editable and non-destructive in Affinity vs. placed/linked in InDesign. This makes cross-platform compatibility difficult. You can package fonts and linked files just like with InDesign and generate print-ready PDFs with advanced options, but the layout file is .af vs .indd. Because Affinity is free for everyone (including printers and companies of any size), vendors can download Affinity and access working files exactly as they would Adobe InDesign files without paying for a subscription.
Layers
The concept of layers is a little different in Affinity. In Adobe Creative Suite, a layer is a container for objects. In Affinity, a layer is an individual object which can be either vector or raster, since both file formats can exist in the same file. You can create “layers” (in the Adobe sense of the word) by creating groups of these objects. An artboard is also a “layer” in Affinity, with all objects on the artboard being contained within that layer.
Pages vs. Artboards
Because Affinity can be used as a page layout program exactly like InDesign, they conceptually separate the concept of pages from artboards. They have slightly different behaviors and properties, and you can convert a page to an artboard and vice versa.
Artboard View Modes
When you are working on an artboard, you can “clip to canvas” to hide objects outside of the artboard or uncheck that setting to show objects outside of the artboard. “Preview Mode” is a way to quickly hide all margins, guides, and gridlines and clip to canvas at the same time.
Non-Destructive Editing
Affinity is non-destructive by default. Adobe uses the concept of “smart objects” for working non-destructively. Affinity uses a similar concept, but it’s implemented in a much more intuitive way. When adding filters, adjusting color levels, etc., the original object is preserved, and the changes are applied as an adjustment layer. This means you can easily disable or adjust changes without affecting the original objects. If you place a photo in a file, the original resolution is retained when you scale the photo up and down. In the history palette, you can scrub through all of your work and edits and even create forks if you add new updates to an earlier version of the file.
Fill Mode
The default settings for Fill Mode (Vector setting) is “Alternate” which creates holes when a path overlaps itself. Switch to “Winding” to make these holes go away.
Masking and Clipping
Layer order and layer nesting is important in Affinity. To create a clipping mask, you simply drag a layer onto another layer. For example, if you drag Layer A onto Layer B, Layer A will act as the clipping mask for Layer B. You can also use this masking technique with groups. When dragging Layer A on top of a group, you will be given the choice to place it inside of a group OR “use as clipping mask”. This masking behavior gets especially interesting when combining vector and raster layers. You can use a vector shape to clip a raster image or a raster image to clip a vector shape. This makes adding raster textures to vector artwork incredibly easy.
Creating a Compound Path
To create a compound path (in the Adobe sense of the word), select both shapes and then hold option while clicking the subtract icon in the top right of the toolbar. Compound paths behave differently in Affinity and do not subtract a top shape from a bottom shape.
Shape Tools vs. Curves
In Affinity, a curve is a vector object with nodes and handles that you can edit. Curves are different from shapes. When you create a shape using the various shape tools (the rectangle tool, circle tool, etc.), you can adjust settings of the shape (like how many points a star has) but you cannot edit the nodes or handles without first converting the shape to a curve. Once a shape is converted to a curve, you can edit the nodes and handles of its paths just like you would a curve.
Swatches
In Affinity, you can have Document, Application, and System swatch palettes. Only a Document swatch palette can contain global swatches (swatches that behave like spot colors but are process colors). Affinity does have Pantone swatch palettes built into the program, unlike Adobe, who dropped their PMS library support. You can export palettes to save / share them or to import them into other documents.
Fonts
Affinity allows you to use any font installed on your computer. Affinity does not come with a large licensed library of fonts like Adobe Creative Suite—part of an Adobe subscription goes toward compensating type foundries and, as mentioned above, Affinity is free for everyone. They did share a collection of fonts with Affinity V1 and V2 users as a thank you for their early support. These only work in earlier paid versions of Affinity. You can license fonts directly from independent type foundries (or go to the big distributors) and install them on your computer, or you can download/install free fonts through services like Google Fonts.
Live Trace
Live trace does exist and has neat features like being able to see side-by-side before and afters of the objects you are live-tracing. What it doesn’t have is an ability to live-trace as a “black and white image” like you can in Adobe Illustrator. You have to adjust the source image to be as close as possible to black and white before live tracing for a similar effect. I have sent feedback along to Canva that an enhancement to live-trace that includes a “black and white” setting would be very valuable to creatives.
Effects & Filters
You can add effects and filters non-destructively to layers and groups when using the “live” versions of the tools accessible in the layers panel. Effects includes things like Bevel/Emboss, Inner/Outer Shadow, etc. Filters are more complex and include blurs, distortions, diffusions, lighting, and all kinds of other things. You can apply them to the full document or drag the effect / filter on top of a group or individual layer so it only applies to that object.
Exporting Multiple Artboards
The easiest way to export multiple artboards is to turn on the Slices studio and export from within that studio. You can confirm / adjust setting for each artboard in the export panel to whatever format / resolution you need.
Custom Studios
Create Your Dream Creative Software

The most exciting feature of Affinity Studio is the ability to create custom studios (similar to “workspaces”) with the panels and tools you use most often for different kinds of work. Affinity comes with a few studios baked in (like Vector, Pixel, Layout, and Retouching) which have all the tools you’d expect to find in those environments. I’ve created two custom studios for my illustration and lettering work—one for larger screens and one for my laptop (which is just a simplified version with less panels). You can download my studios below and give them a spin. These studios alongside my customized shortcuts (see below) have made working in Affinity head and shoulders better than working in Adobe Creative Suite for the kind of work I create—vector art with pixel textures and hand-drawn elements.
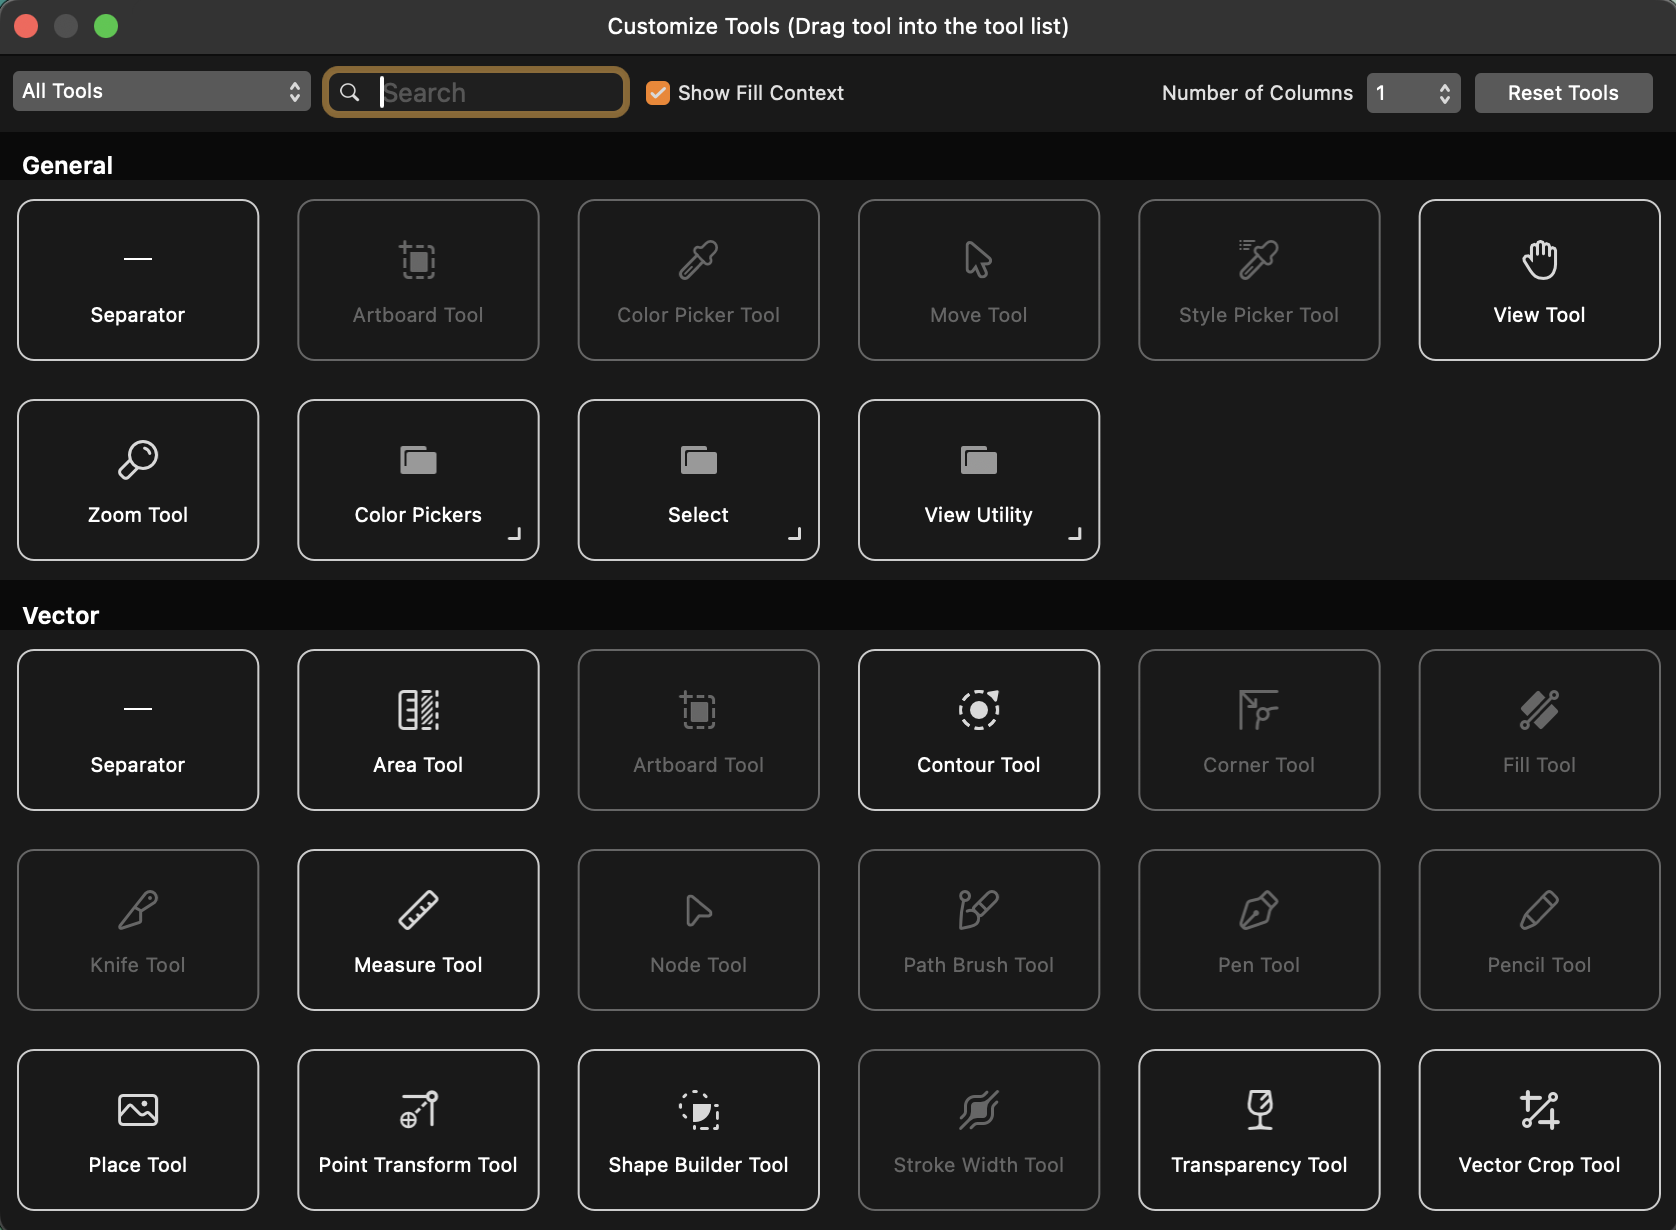
When creating a custom studio, you can control which panels appear on the left and right sides of the Affinity window as well as which tools are available in the toolbar. Click the three dot icon near the bottom of the left toolbar to pull up the tools menu. You can drag and drop tools into the toolbar and create custom groupings of tools.
Download My Custom Studios
Shortcuts & Key Commands
Customize Shortcuts for a Smoother Transition
While there are key command overlaps between Affinity Studio and Adobe Creative Suite, they are not exactly the same—and for good reason. Affinity combines the tools / features of Photoshop, Illustrator, and InDesign into one program, so key commands that make sense in one application might not make sense in another. For example, In Adobe Illustrator ⌘D is used for duplicating an action (step-and-repeat), and in Photoshop it’s “deselect.” In a program that behaves like both Photoshop and Illustrator, you have to make choices about which behavior makes the most sense for each key command.
It’s difficult to learn new keyboard shortcuts after years of muscle memory, so the easiest way to adapt to a new program is to update the shortcuts to be more familiar. I’ve cutomized my Affinity shortcuts to be more aligned with the ones I used for Adobe Creative Suite and added some new ones that make sense specifically for Affinity. You can download my shortcuts file below, and I’ve created chart explaining some of the ones that I find most userful. I didn’t include common shortcuts in this chart that are exactly the same as they are in Adobe Creative Suite.
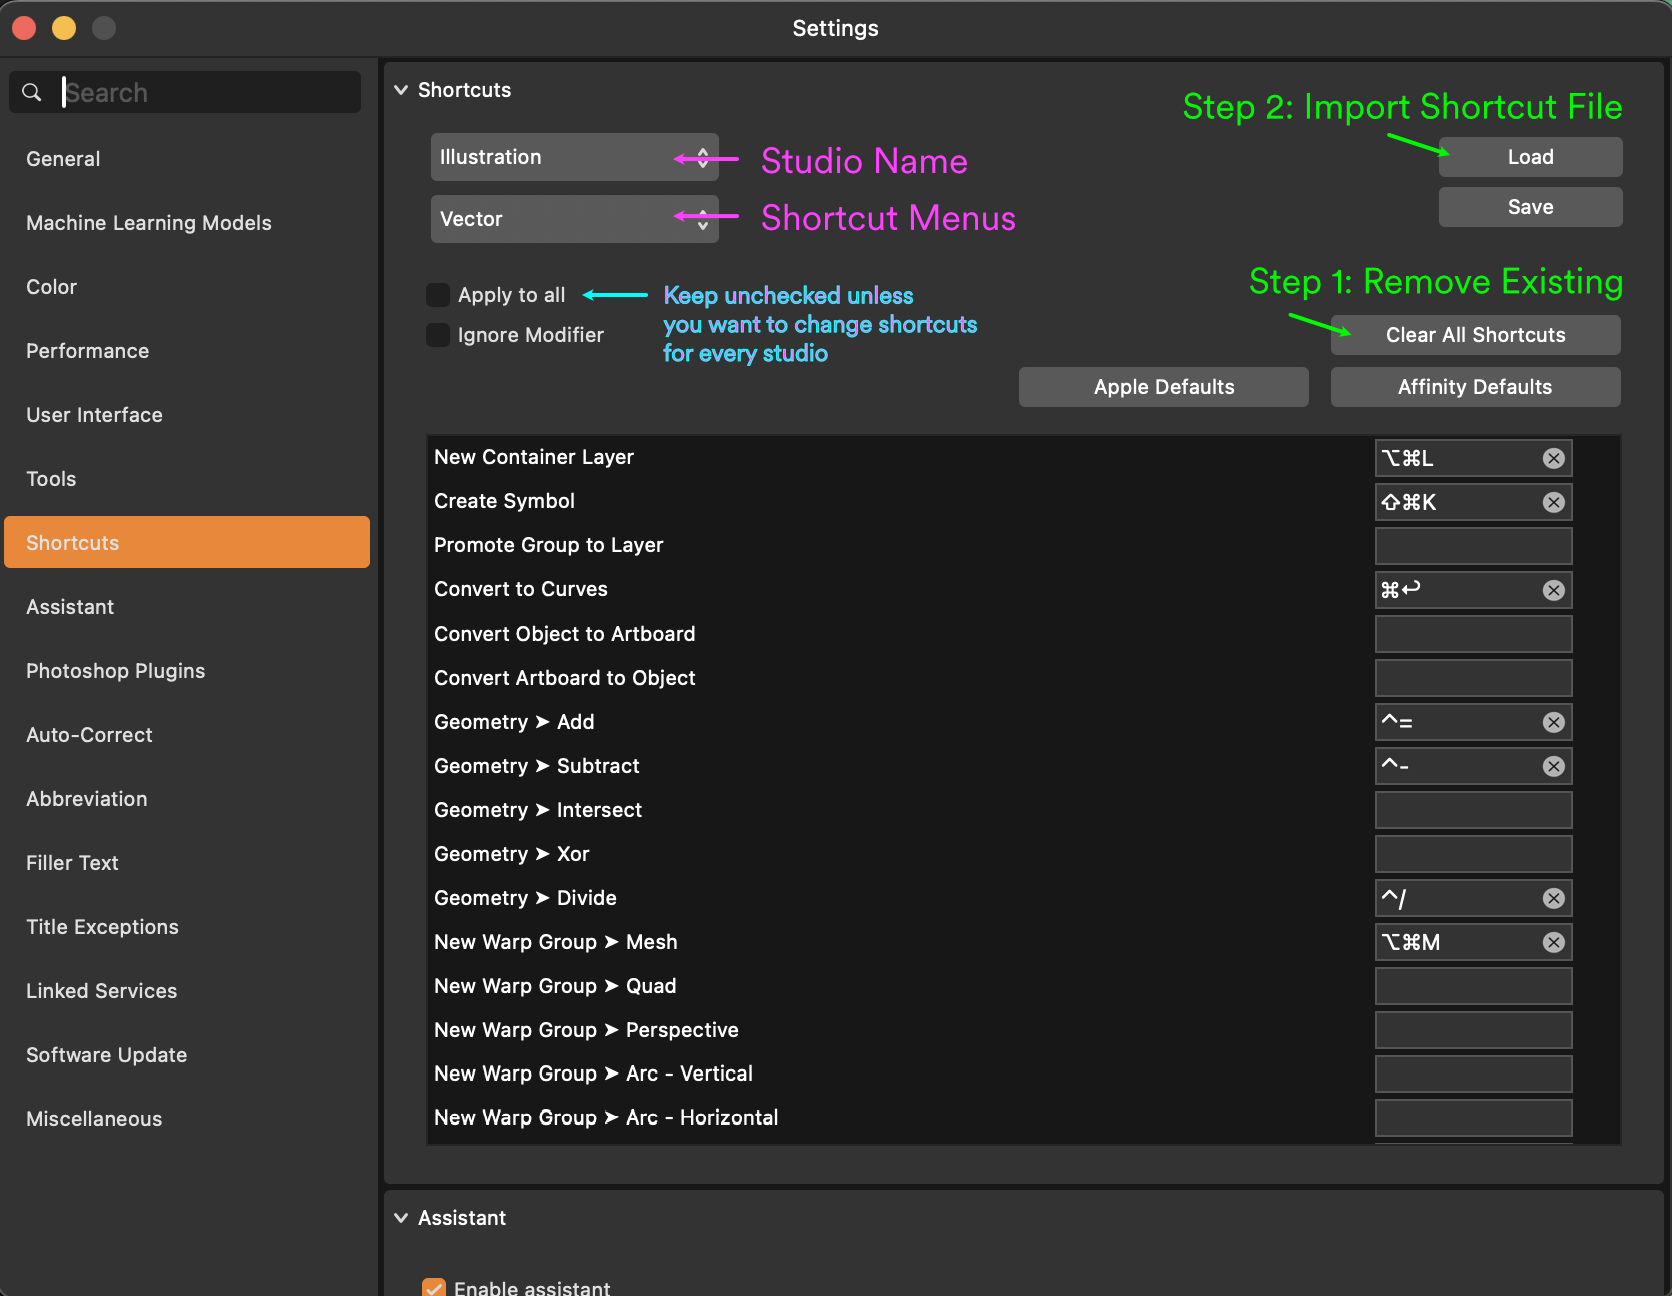
The image above shows what the shortcut menu looks like in Affinity’s settings menu. I’ve labeled some of the menu parts to make it easier to understand what to edit and where to find things. There is a dropdown menu to select a studio, and a dropdown menu for groupings of shortcuts. The easiest/quickiest way to update your shortcuts is to first import or create a custom studio, clear all shortcuts for the studio, and then import the shortcut file I’ve linked below. It’s good to spend time getting familiar with the shortcut menus because they can help you figure out how the program is organized.
Download My Custom Shortcut File
| Shortcut | Name | Menu | Notes |
|---|---|---|---|
| Vector Drafting | |||
| ⌘↩ | Convert to Curves | Vector | Important for converting shapes to editable curves. |
| ⌃/ | Geometry > Divide | Vector | |
| ⌃= | Geometry > Add | Vector | |
| ⌃- | Geometry > Subtract | Vector | |
| ⌥8 | Merge Curves | Vector | |
| ⌘⌥8 | Separate Curves | Vector | Take two curves on the same layer and separate them into two separate curve layers. |
| ⌘8 | Create Compound | Vector | See above notes about compound paths. |
| ⇧⌘8 | Release Compound | Vector | |
| ⇧S | Expand Stroke | Vector | “Outline Stroke” |
| V | Move Tool | Tools | “Select” |
| A | Node Tool | Tools | “Direct Select” (used for editing nodes and handles) |
| S | Pen Tool | Tools | I make the pen tool “S” instead of “P” because I’m generally toggling between the pen tool and node tool when drawing vector paths. This allows me to toggle between them without reaching across the keyboard. |
| P | Pencil Tool | Tools | Since I use “S” for the pen tool, I’m able to give the pencil its own key command (“P” for pencil). |
| C | Corner Tool | Tools | For creating rounded corners at node points. |
| K | Knife Tool | Tools | For cutting paths and shapes into multiple pieces. |
| W | Stroke Width Tool | Tools | This works just like in Illustrator for changing the width of a stroke. You can also use the “Pressure” slider in the Stroke panel to change the width of a stroke for a calligraphic effect. |
| Flip / Rotate Layer (vs. Document) | |||
| ⌘→ | Flip Horizontal | Layer | |
| ⌘↑ | Flip Vertical | Layer | |
| ⇧⌘← | Rotate 90° Counter-clockwise | Layer | |
| ⇧⌘→ | Rotate 90° Clockwise | Layer | |
| Step & Repeat | |||
| ⌘J | Duplicate Selection | Edit | “Step & Repeat” |
| View / Show / Hide | |||
| ⇧⌘0 | Zoom to Selection | View | If you have multiple artboards, this works best for zooming to a specific artboard. Select your artboard and use this key command. |
| ⌘; | Show Guides | View | |
| ⌘' | Show Grid | View | |
| ⌃W | Preview Mode | View | Quickly hide margins, guides, and gridlines and clip to canvas at the same time. |
| \ | Clip to Canvas | View | Hide objects outside of the artboard. |
| ⇧⌘↑ | Collapse All Layers in Panel | Layer | |
| Snapping | |||
| ⌘U | Toggle Snapping | Miscellaneous | |
| Select | |||
| ⌥] | Next Layer | Layer | |
| ⌥[ | Previous Layer | Layer | |
| ⌥⌘A | Select All Layers | Layer | |
| ⌃F | Select Same Fill | Layer | |
| ⌃S | Select Same Stroke | Layer | |
| Color | |||
| / | Set Fill to None | Miscellaneous | |
| ⇧⌥/ | Set Fill to 50% Gray | Miscellaneous | |
| ⇧/ | Set Fill to Black & White | Miscellaneous | |
| ⇧X | Swap Line & Fill | Miscellaneous | |
| X | Toggle Fill Context | Miscellaneous | |
| Textures and Filters | |||
| B | Brush Tool(s) | Tools | There is a pixel brush tool and a vector brush tool. I tend to use the pixel brush tool more often for adding textures to vector artwork. |
| D | Live Diffuse Filter | Pixel | Add a live adjustment layer to an object to give it texture. There are a few ways to add filters, but I prefer the "Live" filter option because it allows me to adjust the filter in real time without permanently changing the layer or converting it to raster. |
| N | Live Noise Filter | Pixel | Good for adding textures within a shape without affecting the edge of the shape. |
| G | Live Gaussian Blur Filter | Pixel | I don’t use the fill tools much in my work, so I changed G to the Gaussian Blur live filter, which I use more often. |
Vector Drafting Tips
Specific Differences in Vector Drafting
Select a Line Segment
There isn’t a way to directly select a line segment on its own (if you touch the segment with the node tool, you will add a point to the path). To select a line segment, select the nodes at the start and end of the segment.
Delete a Line Segment
To delete a line segment, while using the node tool, hold the control key while clicking the segment.
Adding a Node to a Path
Rather than using the pen tool to add a new node to a path, in Affinity you use the node tool. When you click on the path with the node tool, a new node will be added where you clicked.
Delete a Node
To delete a node, select it and click the delete key. If you hold down option while deleting the node, it better maintains the original path / curve.
Editing Nodes
Use the node tool to edit nodes on a path. If you double click a node with the node tool, it will add two handlebars or delete them entirely and is a easy wan to cycle through node styles.
Delete a Single Handlebar
Double click on the end of the bezier handle with the node tool to delete the handle.
Joining Two Different Paths
To join two separate paths, select the two nodes you want to join and click “Join Curves”in the top toolbar. This will create one continuous path on the same layer.You cannot join two different paths with the just the pen tool like you can in Illustrator. This is meant to prevent accidentally joining shapes, but it’s not something Illustrator folks are used to and can create friction when you’re just starting out.
Add a Single Bezier Handle
To add a single bezier handle from a node, click and drag on the path right near the anchor point while holding the command key to create the handle.
Closing a Path
You can drag points on top of one another from the same path to close the path.
Continue Drawing from an Existing Path
To add to a path, select the ode you want to start drawing from with the node tool first before switching to the pen tool. Make sure the node itself is selected, and not the full path.
Circle Back for Updates!
I’ll keep updating this section with more tips and tricks as I discover them. If there’s anything that isn’t clear, or if you’ve encountered an issue that isn’t covered here, please let us know!
And of course if you find this page helpful (or any of our other free tools) and want to support our work, consider becoming a Studioworks member. Members get access to our professional business tools as well as our incredible community with resources, weekly meet-ups, co-working sessions, and more!
